Remove Backgrounds From Images

REMOVING BACKGRONDS
ISOLATE THE SUBJECT OF THE PHOTO
Photos can be tricky when you only want a certain part of it. You could painstakingly remove the background using a computer program but that could take a while depending on how complicated your photo is!
With Burner Bonanza you can simply upload your photo and it’ll do most if not all of the work for you!
HOW TO
1. Visit https://burner.bonanza.
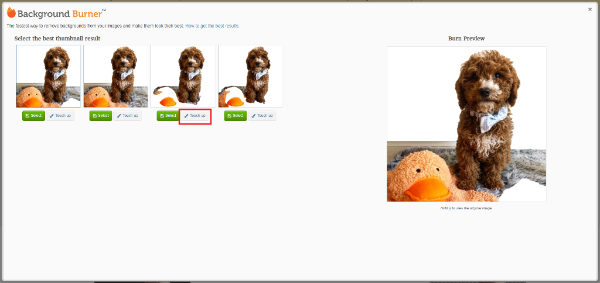
2. Drag and drop the image you want to remove the background from into the image box (Circled in red). OR click on the ‘Choose a photo’ button to select the photo with file explorer.
3. Wait for the image to upload and process.

4. Once your photo is uploaded, Burner Bonanza will try to automatically remove the background for you. Sometimes this works perfectly and you can select the photo you want with the green ‘Select‘ button. Otherwise you’ll have to touch up the photo yourself with the ‘Touch up‘ button (circled in red).
5. You’ll be directed to the basic tools page where you can change what the photo’s background is. Using the Red Minus tool you can remove parts of the background from the image. With the Green Plus tool you can add in what you want to remain in case a mistake is made! Once done click Finish.

6. Once done, you’ll need to login (or create an account) in order to download your image and viola! You’re done.
If you want to learn more photo tricks like this make sure you book into our ‘All about Photos’ workshop on the 6th of September! More information can be found further down in this email.
You may also like

iPhone Photos Visual Look-Up Feature

Linking your COVID vaccination certificate to the Services Victoria App
